Four Small Experiments to Learn Propagating Vines from Cuttings
Propagation is one of the most satisfying indoor-plant skills: it teaches observation, builds confidence, and gives you spare plants without complicated gear. These four small experiments are designed so each one is short, repeatable, and builds on the last. Pick a single healthy vining plant (pothos, philodendron, tradescantia, or similar) and work through them over a few weeks.
Before you begin: a simple checklist
Materials to have on hand:
- Sharp scissors or pruning shears, cleaned with rubbing alcohol
- Clear jar or glass for water rooting
- Small pots (6–10 cm) and well-draining potting mix for soil rooting
- Labels or masking tape and pen
- A bright, indirect light spot (no direct noon sun)
Experiment 1 — Take a confident cutting (time: 5–10 minutes)
Objective: learn where to cut so a cutting has the best chance to root.
- Choose a healthy vine section with at least 3 nodes (small bumps along the stem where leaves or roots form) and several leaves.
- Make a clean cut about 1 cm below a node. Remove any lower leaf that would sit below the water or soil line.
- Label the cutting with the date and note which part of the mother plant it came from (e.g., “top vine”).
What to observe: practice identifying nodes and noticing how new growth emerges from them. If the plant has aerial roots, note where they appear—those nodes root most readily.
Experiment 2 — Rooting in water (time: 1–4 weeks)
Objective: watch roots form and learn how light and water changes affect growth.
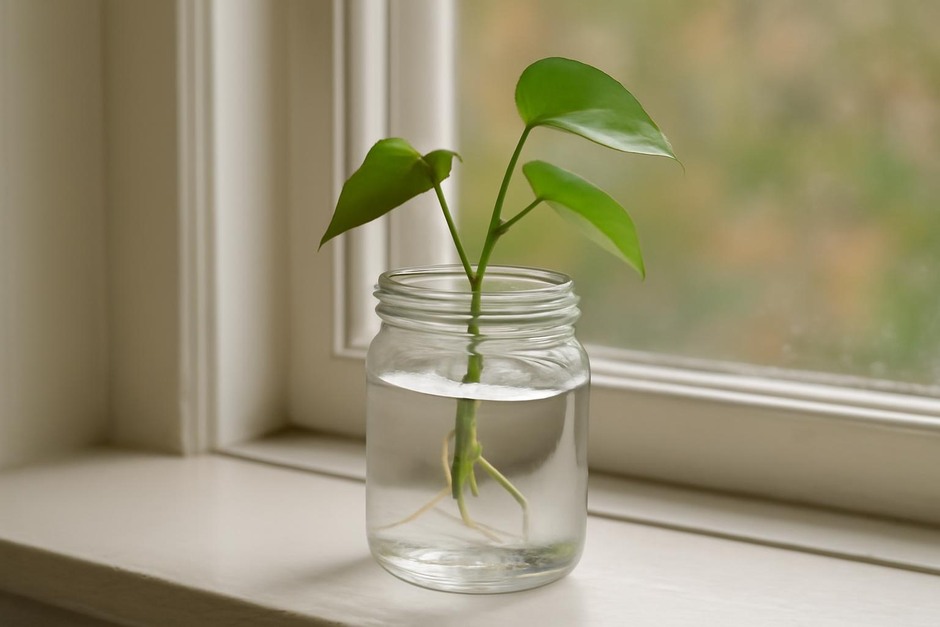
- Place the cutting in a clear jar with enough water to cover the nodes but not the remaining leaves.
- Keep the jar in bright, indirect light and change the water once a week.
- Observe daily for root emergence; take photos every few days to track progress.
What to observe: note how long it takes for roots to appear and whether they are thin or thick. If roots are slow to form, try moving the jar slightly closer to light (not direct sun) or ensure the water is replaced regularly to avoid cloudiness.
Experiment 3 — Rooting directly in soil (time: 2–6 weeks)
Objective: compare soil rooting to water rooting and learn the feel of a successful soil-rooted cutting.
- Dip the node of a fresh cutting into a little clean potting mix or moisten the mix well before planting. Do not compact the soil tightly around the stem—keep it airy.
- Place the pot in bright, indirect light and keep the mix lightly moist but not soggy. A small dome or clear bag loosely placed over the pot can help retain humidity for the first 1–2 weeks.
- Gently tug after 3–4 weeks; resistance suggests roots have formed.
What to observe: soil-rooted cuttings often feel firmer when they start to root. Compare timing to your water-rooted cutting. Some species root faster in water; others prefer soil.
Experiment 4 — Transition and encourage branching (time: 2–8 weeks)
Objective: learn how to move a rooted cutting into its long-term pot and encourage fuller growth.
- If you rooted in water, wait until the roots are 3–5 cm long before transplanting to potting mix. For soil-rooted cuttings, transplant when you feel resistance from roots.
- Plant in a slightly larger pot with fresh, well-draining mix. Place the cutting so nodes are just below the soil surface.
- To encourage branching, pinch or trim the growing tip after the cutting has established (new leaves appearing). This redirects energy into side shoots.
What to observe: note how the plant responds after pruning. Healthy stress-free transitions usually show fresh growth within a few weeks. If growth stalls, check light and moisture rather than repotting again immediately.
A short repeatable routine for success
Use this quick weekly check for any cutting or recent transplant:
- Look: inspect leaves and nodes for healthy color and no soft spots.
- Feel: check the soil or root jar—water-rooted cuttings should have clean water; soil should be slightly damp but not wet.
- Adjust: rotate the jar/pot a quarter turn for even light and move slightly closer to or farther from the window if growth is slow.
These four small experiments—taking a good cutting, rooting in water, trying soil, and transitioning to a pot while encouraging branches—teach both the practical steps and the observational habit that make propagation repeatable. Repeat the cycle with different vining species to see their particular preferences. Over time you’ll quickly learn which method your plants prefer and how to build a steady rotation of new, healthy starts for your windowsill.